|
|
|
||||||||||||||||||
|
|
|
|
|
||||||||||||||||
|
|
|
|
|
||||||||||||||||
|
|
|
|
|
||||||||||||||||
|
|
|
||||||||||||||||||
|
|
|
|
|
|
|||||||||||||||
|
|
|
|
|||||||||||||||||
|
|
|
||||||||||||||||||
|
|
|
||||||||||||||||||
|
|
|
|
|
|
|
||||||||||||||
|
|
|
||||||||||||||||||
|
|
|
||||||||||||||||||
|
|
|
|
|
 |
|
||||||||||||||
|
|
|
|
|||||||||||||||||
|
|
|
|
|||||||||||||||||
|
|
|
 |
|
||||||||||||||||
|
|
|
|
|||||||||||||||||
|
|
|
|
|
|
|
|
|
|
|
|
|
|
|
|
|
|
|
|
|
|
|
|
||||||||||||||||||
|
|
|
|
|
||||||||||||||||
|
|
|
|
|
||||||||||||||||
|
|
|
|
|
||||||||||||||||
|
|
|
||||||||||||||||||
|
|
|
|
|
|
|||||||||||||||
|
|
|
|
|||||||||||||||||
|
|
|
||||||||||||||||||
|
|
|
||||||||||||||||||
|
|
|
|
|
|
|
||||||||||||||
|
|
|
||||||||||||||||||
|
|
|
||||||||||||||||||
|
|
|
|
|
|
|
||||||||||||||
|
|
|
|
|||||||||||||||||
|
|
|
|
|||||||||||||||||
|
|
|
|
|
||||||||||||||||
|
|
|
|
|||||||||||||||||
|
|
|
|
|
|
|
|
|
|
|
|
|
|
|
|
|
|
|
|
|
| PHOTO TIPS |
| This section of the site continues to grow. I add tips as I come up with ideas and time permits. Please check back often. |
|
|
|
|
|
|
|
#1
COMPOSITION The first thing that is the most important of all is �Composition�. The set of things included in an image must be arranged in a way to bring out the most visual interest. Another well known rule in photography that is related to composition is called �The rule of thirds�. It is one rule the helps to arrange the subject in your image to have a visually stimulating picture. If you are not familiar with the rule of thirds, do a search on the internet to find out what it means. That is just one example of things related to composition. Composition is the most important aspect of good photographs. If you don�t do anything else, work on improving your composition. If a picture has perfect exposure and is clear but the subject mater is uninteresting or cluttered the picture will be just another snap shot. |
|
#2
QUALITY OF LIGHT The second thing to consider is the light that is illuminating your subject. "Film" or for that matter "digital sensors" do not see a scene like your eyes do. The range of light that can be captured on film or a digital sensor is much less than the eye can capture. For that reason it is better to seek out situations where the range of light is less. Usually morning or evening times provide this type of light. Pictures taken in the morning or evening also have the added benefit of having a warmer color tone to them. (more yellow and red) This is due to the filtering of sunlight through the atmosphere. Scenes located in full shade or on overcast days also have light that is more even or diffused. The disadvantage to overcast days is that you normally have to keep the sky out of the image because it is so much brighter than the rest of the picture that your film will not be able to capture the entire range of light. If you take pictures where the range of light is larger than you film can capture you will probably have one of the following problems. If you choose an exposure that properly exposes the brighter areas of the image then the darker areas or shadow areas will be underexposed. I you choose an exposure that properly exposes the darker areas of the image then the bright areas will are overexposed. |
|
#3
TECHNIQUE Technique is all the other things that are not covered by the first two items. Technique includes things like using a tripod to hold you camera steady so that you shots are sharp. It would also include things like proper exposure and depth of field. There are probably hundreds of things that could fall under the category of technique. Technique is anything in your set of photography tools which helps to capture the scene as you intended not just letting it happen by luck. |
|
#4
SELF CRITIQUE The last item is to review your photos. Critique them to see what you did wrong or what to improve the next time you take a picture. The process you use to critique your pictures can be improved by getting feedback from other people who understand photography. Usually your friends are not very good for feedback because they will tell you that your pictures look great even when they don�t. There are many websites on the internet that are geared to giving you feedback on your pictures. Just remember that some of the feedback you get will be valid and some will not. You have to act as the filter to determine what is valid. Also remember that what one person likes the next person will dislike. You cannot please everyone. The most important person to please is you. I have had individuals critique my photos and complain about a certain aspects of the picture and that aspect of the picture was my exact intent. For example it could be that a person did not like a reflection off of the water in a particular picture but my intent was that I wanted that reflection in the picture to give it a particular look. Remember what I said earlier? Please yourself first and take the feedback you receive with a grain of salt. |
|
What is it about some pictures that make you want to look at them and explore? Many times it's the detail or the clarity of the image. In order to obtain top-notch detail in your photos the camera needs to be steady when you take the picture. This can be just as important and in many cases more important than having a good lens on your camera. The best way to do this is to mount your camera on a tripod. If you are serious about your pictures this tip alone will pay big dividends. Another advantage to having your camera supported on a steady platform is that you can shoot in low light situations and use slower speed fine grain film. Buy the best tripod you can afford taking into consideration what it will be used for. If you are going to need to carry the tripod for any distance like hiking in the mountains, then weight will be a major concern. There are situations where a tripod is not practical. If you can't use a tripod try some other method of support. One alternative is a monopod. A monopod does not deliver the stability of a tripod but it much better than nothing. A monopod is also easier to transport and set up.
|
 Analyze the scene before you take the shot.
Just because a scene looks good to you from your minds eye, doesn't always
mean it will look good as a picture. You brain is able to focus your attention
on the detail of your interest while ignoring the rest of the clutter in the
scene. A photograph includes everything that was in the frame at the time of
exposure. Once the image is developed and viewed, any distractions will be
magnified. The picture shown in this example reflects both the good and the
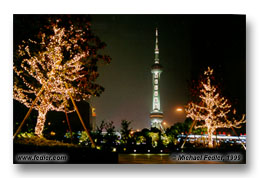
bad. This shot was taken on a very busy street in downtown Singapore, though
you wouldn't know it from looking at the picture. If I had moved just slightly
to my left I might have been able to remove the bright background resulting in
an even stronger image.
Analyze the scene before you take the shot.
Just because a scene looks good to you from your minds eye, doesn't always
mean it will look good as a picture. You brain is able to focus your attention
on the detail of your interest while ignoring the rest of the clutter in the
scene. A photograph includes everything that was in the frame at the time of
exposure. Once the image is developed and viewed, any distractions will be
magnified. The picture shown in this example reflects both the good and the
bad. This shot was taken on a very busy street in downtown Singapore, though
you wouldn't know it from looking at the picture. If I had moved just slightly
to my left I might have been able to remove the bright background resulting in
an even stronger image.
Before you take your picture there are several things to consider. First, get in the habit of looking through the viewfinder to asses the composition before snapping the picture. Sometimes all it takes is for you to move your position in order to eliminate distracting elements from the scene. Second, is to check the background color and brightness. Will the background be brighter, darker, or the same intensity as the subject matter of your photo. Will the color provide good contrast or will it also become a distraction. The best advice I can give on this is to analyze the scene for appropriate backgrounds prior to pressing the shutter release. Third, is to move closer or zoom in to eliminate unnecessary elements from the border of the picture. |
|
One thing that draws attention to your photos is color. More specifically bold colors and color contrast. Keep your eyes open for bold color situations that present themselves. Primary colors can be very striking. 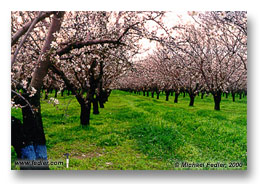 The second trick is to use a splash of a contrasting color to draw attention to
your main subject. In many cases the smaller contrasting color can be the main
subject of your image.
The second trick is to use a splash of a contrasting color to draw attention to
your main subject. In many cases the smaller contrasting color can be the main
subject of your image.
The picture show in this example of an almond orchard in full bloom was brought to life by the lush green carpet of grass. The chance spotting of a tree marked with a patch of blue paint provided a nice contrast in color as well. The day this photo was taken the sky was pretty much overcast so inclusion of it resulted in a white background. This picture would have been stronger if the sky had been blue providing another primary color, but that was not the case on this day of traveling away from home. |
|
If you want to improve the presentation of a picture that you would like to display in your home, what would you do? 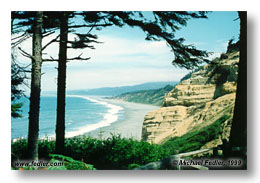 Almost without question, you would mount it in a frame. Well you can do that
with the subject matter in some of your photos as well. Try taking a picture
through a doorway or window. For nature shots, there are plenty of situations
that allow this technique to be used. In some cases, what you thought was
getting in the way of your shot can actually be an enhancement to it.
Almost without question, you would mount it in a frame. Well you can do that
with the subject matter in some of your photos as well. Try taking a picture
through a doorway or window. For nature shots, there are plenty of situations
that allow this technique to be used. In some cases, what you thought was
getting in the way of your shot can actually be an enhancement to it.
In the example shown here the overhanging trees were used to frame this photo of Agate Beach on the north coast of California. One thing to keep in mind when using this technique is the relative brightness of the frame and the main subject. Many times the frame may be much darker. For instance, taking a picture from indoors through a window or door. If the frame is much darker, will it look good in silhouette? If not, can flash be used to brighten up the frame while still allowing correct exposure of your main subject? |
|
Leading your viewer into the scene is one of your main objectives. By providing subject matter in the foreground that is interesting, you provide a starting point that the viewer can use to start exploration of your photo. 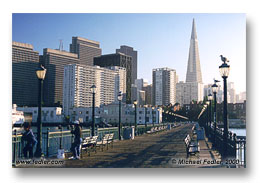 Sometimes this can be as simple as having something in the foreground
that provides a visual frame of reference. For example, if you were
photographing a mountain scene, the foreground visual reference
might be a rock or a flower. The foreground reference being closer
than main subject matter (the mountain) tends to grab the viewer's immediate
attention and draws their attention into the scene leading the
viewer to the main subject (in this case the mountain) which is farther
in the distance. This technique promotes the exploration of your photo by the viewer. In most cases the foreground enticement needs to be
in sharp focus so that it is not viewed as just a distraction. So check
your depth of field.
Sometimes this can be as simple as having something in the foreground
that provides a visual frame of reference. For example, if you were
photographing a mountain scene, the foreground visual reference
might be a rock or a flower. The foreground reference being closer
than main subject matter (the mountain) tends to grab the viewer's immediate
attention and draws their attention into the scene leading the
viewer to the main subject (in this case the mountain) which is farther
in the distance. This technique promotes the exploration of your photo by the viewer. In most cases the foreground enticement needs to be
in sharp focus so that it is not viewed as just a distraction. So check
your depth of field.
The example shown here (Embarcadero Pier in San Francisco) is an exaggeration of this technique. The converging lines of the two sides of the pier lead the viewer�s eyes toward the downtown scene. Try this technique soon on an appropiate scene and see if it will help draw the viewer into you image. |
 One thing I have found that
I have to be diligent about is checking to make sure my camera
is level as compared to the scene I am photographing. This is
particularly important when taking pictures over water or of
sunsets since they are typically aimed at the horizon. Try to
actively think about this while preparing to take your
picture. While looking through the viewfinder, check to make
sure features that should be level are parallel with the top
or bottom edge of your viewfinder. This also applies to
vertical subjects, make sure they are perpendicular to the
bottom or top edge of your viewfinder.
One thing I have found that
I have to be diligent about is checking to make sure my camera
is level as compared to the scene I am photographing. This is
particularly important when taking pictures over water or of
sunsets since they are typically aimed at the horizon. Try to
actively think about this while preparing to take your
picture. While looking through the viewfinder, check to make
sure features that should be level are parallel with the top
or bottom edge of your viewfinder. This also applies to
vertical subjects, make sure they are perpendicular to the
bottom or top edge of your viewfinder.
You can see in the example shown here how easily the viewer would notice if the subject was not leveled properly. So, before you press the shutter release check the image in you viewfinder to make sure it's level. |
|
Do you remember when you were a kid being told how to take a picture? Usually first photography experiences are while trying to take an outdoor picture of family members. If you are like me, you were probably told the same thing I was told, "make sure everyone in the picture is facing the sun and your back is to the sun". This method did serve to get light on everyone's face, but it also ensured everyone would be squinting their eyes. The reason for the need to have everyone facing the sun was to ensure everyone had the same level of light striking their face . If anyone's face was shaded, they would appear too dark in the final photo.
Film does not have the dynamic range of brightness that your eyes have.
You are able to see things in a scene that are very bright while still
being able to see things that are very dark. Film on the other hand sees
a much smaller range. So if the scene has bright areas and dark areas,
you will probably only be able to see one or the other depending on what
exposure setting you use. One way around this problem is to photograph
in situations that don't have as wide a range of brightness. If your
camera is sophisticated enough to know what shutter speed to use
when in lower light level situations, you would be much better off to
take pictures in the shade than in the sun.
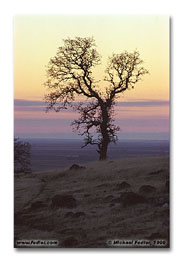
The best light for outdoor photography is in the early morning or in the very late afternoon to early evening. The reason for this is the light reaching the scene is less intense, more diffused and warmer in color. The yellow and orange tones of the light at these hours is usually very pleasing. I enjoy viewing pictures that are taken under these lighting conditions and so will most of your viewers. The example photo here shows an oak tree photographed just before sunset. Even under the less intense lighting condition, I still was not able to capture the detail in the foreground that I would have liked due to the wide range of light to dark in the scene. |
|
To me composition is a subjective thing that is difficult to get everyone to agree on. There is however a simple rule for composition that most everyone seems to agree on. It's the "Rule Of Thirds". Use this rule as a starting point or general guideline for your composition. 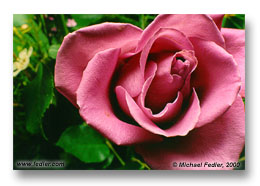 The idea is to divide the scene into three sections both
horizontally and vertically. The main subject of your image
should then be located on one of the intersections of the
vertical and horizontal division lines. The picture shown here of
the rose demonstrates the rule of thirds composition principal.
If you will notice, the center of the flower is about two thirds
up from the bottom of the image and about two thirds over from
the left side. This type of layout provides your viewer with an
image that has enough layout complexity to spark visual interest.
The idea is to divide the scene into three sections both
horizontally and vertically. The main subject of your image
should then be located on one of the intersections of the
vertical and horizontal division lines. The picture shown here of
the rose demonstrates the rule of thirds composition principal.
If you will notice, the center of the flower is about two thirds
up from the bottom of the image and about two thirds over from
the left side. This type of layout provides your viewer with an
image that has enough layout complexity to spark visual interest.
Now the question is: Is that all I need to do to compose a photo correctly? Of course the answer to that question is "no". In fact I'm sure I personally break the rule of thirds as often if not more than I follow it. In general I don't really think about specific rules for composition. From my perspective you as an individual need to decide what you want to accomplish with your image composition. You need to decide what things in a composition you like or dislike and then try to incorporate the things you like into your photographs. No situation is the same so you must continue to deal with each new composition as they present themselves. The best advice I can offer is to take a look at the subject matter you wish to photograph from several different views before snapping the shot. I have found that as far as composition critiques are concerned, what one person likes the next person dislikes. So compose the image the way "You" think is most pleasing and evaluate the results once developed to see how well you accomplished your objective. This method will do two things: Number one, it will define the image from your unique perspective rather than being governed by a strict set of compositional rules. Number two, it will improve your photographic talents over time. Of course the improvement will happen only if you analyze your results and then carry any learning gained forward to your next project. |
 The old saying "Practice Makes
Perfect" applies here. I don't think you can ever become perfect
in photography but you can definitely hone your talents. What I
mean by the word "Practice" is to take pictures as often as your
time or budget allows. Don't just shoot a lot of pictures for the
sake of quantity. Shoot what you can with the intent on improvement.
A simple analogy to this is driving a car. I know of plenty of
people that drive and get plenty of practice at it but never improve
there driving skills. The reason for this is they are not actively
trying to improve their driving talents. They are just driving.
The old saying "Practice Makes
Perfect" applies here. I don't think you can ever become perfect
in photography but you can definitely hone your talents. What I
mean by the word "Practice" is to take pictures as often as your
time or budget allows. Don't just shoot a lot of pictures for the
sake of quantity. Shoot what you can with the intent on improvement.
A simple analogy to this is driving a car. I know of plenty of
people that drive and get plenty of practice at it but never improve
there driving skills. The reason for this is they are not actively
trying to improve their driving talents. They are just driving.
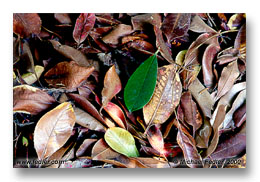
After you have your pictures developed, be sure to analyze them to see what went right and what went wrong. You'll find that you will remember what you did wrong at the moment you took the picture when you review your work. You will also find that you make mistakes that you did not realize at the time of exposure. If you are watching what you are doing and analyzing your results, the number of mistakes you make will diminish over time. If you are new to photography your mind will be racing over all the important things you are suppose to remember while taking that important shot. There will be more things to remember about exposure, composition, and equipment than are humanly possible to think about at one time. The important thing is that over time and with practice the things you were trying so hard to remember each time you were getting ready to take a shot will come to you as second nature. Once that starts to happen, you can start using your artistic talents rather than worrying about all the little details. The image shown as an example along with this tip is one of many photos I have taken around my home just because I wanted to practice. In this shot I was combining three areas of practice: #1 Composition, #2 Color contrast, and #3 Macro photography. I practice and experiment often to learn what works for me and what doesn't. Go ahead and see what some serious practice can do for your skills. |
|
Okay you know all the general rules of photography. Now if you implement them every time you take a picture the resulting image will be perfect. You know as well as I, that this type of thinking is flawed. 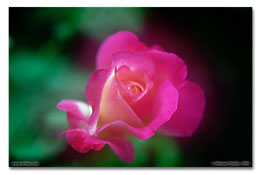 Following the rules just for the sake of following rules will not guarantee
a perfect image. You need to try different techniques even if those techniques
go against some predefined rule. This is one of those things where you need to
find what works and what doesn't work for your style. For example, the rule of
thirds that was mentioned in the "Composition" tip says that the main focus
point of your picture should not be in the center of your image. The rule
does have benefits but it shouldn't rule every image you take. If your were to
strictly adhere to a given set of rules; your pictures would all start to
look the same. Try different things even if they happen to go against one
of the rules. This will allow you to learn and grow as a photographer. Remember
rules of photography are there as guidelines to help you consistently take
acceptable pictures. They are not necessarily there to ensure you take great
pictures!
Following the rules just for the sake of following rules will not guarantee
a perfect image. You need to try different techniques even if those techniques
go against some predefined rule. This is one of those things where you need to
find what works and what doesn't work for your style. For example, the rule of
thirds that was mentioned in the "Composition" tip says that the main focus
point of your picture should not be in the center of your image. The rule
does have benefits but it shouldn't rule every image you take. If your were to
strictly adhere to a given set of rules; your pictures would all start to
look the same. Try different things even if they happen to go against one
of the rules. This will allow you to learn and grow as a photographer. Remember
rules of photography are there as guidelines to help you consistently take
acceptable pictures. They are not necessarily there to ensure you take great
pictures!
I have provided an example here of a rose that is placed directly in the center of the frame. This goes against the rule of thirds. I wanted to try something different with this shot. I wanted to give the rose a soft look without the use of any filters. I actually wanted to call attention to the soft look by placing the rose directly in the center of the picture. This shot is actually a double exposure. I first set the lens to a fairly wide aperture to reduce the depth of field, then I de-focused (to give a fuzzy look) and took the first exposure. I then re-focused on the leading edge of the rose petals and took the second exposure. The final result was an image of a rose with a soft halo look to it. Even though it did go against some of the rules, I still was pleased with the final result. |
|
Sometimes you start out with the intention to shoot a particular type of picture but nothing seems to go as intended. Many times I have started out on a photographic outing visualizing a particular idea in my mind only to find that the weather or the surrounding do not lend themselves to my visualization. What can be done in a situation like this? There are several options: You can wait until conditions are perfect, or maybe you can manipulate the surrounding to suit your needs. If you were trying to take a picture of a sunset and it was too early in the day then just waiting might be an option. If you are working in a studio you can manipulate the light and the surroundings, but in most cases these options are not practical for the scenic or nature photographer.
In cases where you can't get the type of shot you were looking for there are
at least two options that are practical. The first option is to switch your
subject matter to something different. Lets say your original intention was
to travel to a remote location and to shoot outdoor scenes with plenty
of blue sky. You arrive at your destination the night before ready for a day
of photography as soon as you wake up the following day. The problem is the
next morning you wake up to discover an overcast day. And as you know, if
the sky is overcast it will be much brighter than the rest of the scene
making for an image with too much contrast to be captured successfully. The
answer, switch your subject matter. Instead of taking pictures of wide open
scenes, limit your pictures to tight shots of plants or scenes that do not
include the sky. Pictures of plants actually turn out better on overcast
days since the light is more diffused with more even illumination. This is
just one example of switching subject matter. There are many more.
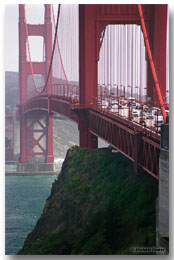
The picture shown in the above example of the Golden Gate Bridge was taken on one of those days when things weren't working as I wanted. I had traveled to San Francisco early one summer morning with the intent of spending the day taking pictures of the bridge. The sky was clear when I woke up, but as I drove toward San Francisco the sky became more and more overcast. By the time I got to my destination at about dawn the sky was completely overcast. I turned on the radio to find out what the weather was going to be like only to hear that the fog would remain most if not all of the day. The weather in San Francisco in the summertime can often times be foggy or overcast. It was just my luck that the day I had picked was one of those days where the sun was to remain behind the overcast sky. I decided that I would go ahead and take pictures of the bridge and see if I could capture any good ones. Sometimes the fog around the bridge can result in some stunning pictures. The fog on this day however was not the type that warps itself around the structure making for interesting composition. It was the type that sits high in the sky creating a bright white monotone background. I split the day using part of it to take pictures of the bridge as I had originally intended. I used the other part of it to switch my subject matter to scenes of the city trying to avoid the sky. Even though the day of photography did not turn out the way I had planned, I was able to capture some pictures that made the trip worthwhile. I didn't get what I had originally intended to but I did get something! |
|
The importance of the photographer versus the importance of the equipment is no contest. The photographer behind the camera is much more important to the final quality of a photograph than the equipment used to take it. A camera can't take pictures by itself and even if it could it doesn't have the ability to select the subject and compose the scene. 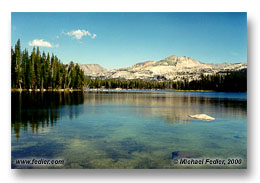 You have probably at one time or another seen an extraordinary picture taken
with an ordinary camera and thought to yourself it was just luck that the
picture was extraordinary. You may have been right but again the picture
quality may have been due to the skill of the photographer rather than just
pure luck.
You have probably at one time or another seen an extraordinary picture taken
with an ordinary camera and thought to yourself it was just luck that the
picture was extraordinary. You may have been right but again the picture
quality may have been due to the skill of the photographer rather than just
pure luck.
I like to view photography sites on the Internet just like you are doing now. I can think of one particular photographer that I have noticed while browsing through photography sites that uses relatively simple low cost 35mm camera equipment. The interesting thing is that many of her pictures "in my opinion" are exceptional. This is a prime example of a photographer's skill out stripping the perceived quality of the equipment. The fact however is that most camera equipment is capable of taking quality pictures even if it is not the latest high priced wizbang camera. So, in my opinion it is better to work on improving your skills as a photographer than worrying about having the highest priced equipment. I don't want to mislead you into thinking that the equipment is not a factor or that I don't drool over the latest equipment when it comes on the market. Quality equipment in many cases can make your life as a photographer easier due to additional controls and available features. It is just not the most important factor.
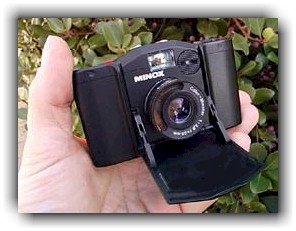
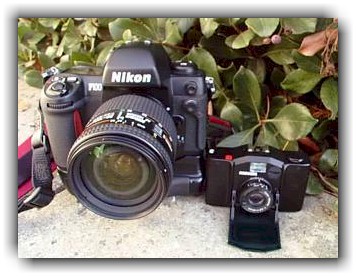
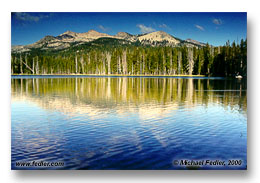
The picture of Wright's lake that I have shown in this segment of "Photo Tips" was
taken with a Minox 35EL which is an older very small 35mm viewfinder type camera.
Here is a picture of the Minox to show you what it looks like. I have also included
a picture that shows both the Minox 35EL and a Nikon F100 for comparison. Both of
these camera illustration photos were taken with a Minolta Dimage V digital camera.
|
|
In order to take full advantage of your camera and related equipment you need to become familiar with everything about it. Reading the manual is a good start, but to really know your equipment you need to try out all the features yourself. Just like understanding how to program your VCR so that it doesn't flash 12 o'clock all the time, learning all the controls and features comes easier to some than others. So if you are the type that finds it hard to master technical gadgets this may take more effort. Sometimes knowing what all the knobs and buttons do doesn't seem to be worthwhile. It�s only in those critical situations that it becomes apparent that knowing what functions are available and how to use them really pays off. 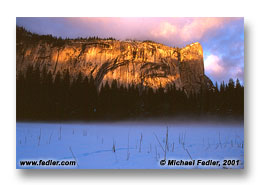
Once you have learned how everything works, try to make a habit of setting all controls in a default position when you finish a photo session. When I say default, I mean default for you, not necessarily the factory default settings. This makes it much easier the next time you pick up the camera and start using it. This is especially true if you use your equipment infrequently. I personally have made the mistake of picking up my camera and shooting a few shots before I realize that I had left something in a state the renders a less than adequate result due to odd setting positions. One example of this type of mistake that I have made more than once is leaving my camera in the self-timer mode. Many times I use the self-timer mode when the camera is tripod mounted to minimize camera shake when taking a longer exposure or when taking macro shots. When picking up my camera for my first shot after some period of inactivity, inevitably I will be taking a hand held shot and when I press the shutter release button nothing happens. Once the shutter does fire the composition may have changed and the shot is lost. At the very least, keep your camera owners manual in your camera bag so that its always with you. This comes in very handy if you forget how something works or just want to verify something. On more complex cameras they may have programmable settings that require a reference manual due to the large number of settings and options that are just impractical to memorize. I keep several equipment manuals in a zip lock type plastic bag in the back of my camera bag just in case I need to refer to one of them. This practice has come in handy more than once. When taking the winter scene photo in Yosemite included in this photo tip segment, the conditions were changing very rapidly. There were several good subjects at different angles from where I had my tripod set up. I was trying to capture all of these different subjects using several different lenses as the evening light was disappearing. At the same time the cloud and fog conditions were changing by the minute. I was frantically working to capture as much as I could as the light changed color prior to losing it altogether. In this situation I was very glad that I knew how to use the various features on my camera so that the different setups conditions came naturally to me. So I highly recommend that you know your equipment. You never know when it will pay off with great results! |
|
Do you hate to use your flash because the results don't meet your expectations? If that�s the case or you just want better results; why not try bouncing the light. A flash is a small single point light source that can give results with harsh highlights and exaggerated shadows. Another problem using a flash for portrait photography is red-eye. Red-eye happens when the angle of the lens to subject to light source is too small. 
All of these problems can be overcome by bouncing the light from your flash off of a nearby surface rather than pointing it directly at your subject as is normally the case. This technique is only possible if you have a flash unit with a movable head or a cable that lets you remove the flash from your camera. If you have a flash setup that allows this you can point the flash away from your subject and bounce the light off of another surface rather than directly at your subject. In most cases you will want the bounce surface to be white. That way the results will have a more natural looking appearance. When you bounce the light off of a nearby surface it does two things (in most situations) that improve the light. First it diffuses the light making it appear less harsh and more like the lighting conditions you would see on an overcast day. Secondly it makes the light appear to be coming from a larger source. This helps to improve (or decrease) the exaggerated shadow condition. The other problem of red-eye is also eliminated. This is because when bouncing the light, you move the apparent location of the light source away from the camera thereby increasing the angle from the lens to subject to light source. The only caveat is the reduced light level due to the increased distance from the flash head to the subject and the loss of light due to the absorption of some of the light striking the bounce surface. One of the methods I like to use to bounce the light is to use a piece of white foam board (the type you can buy at any crafts store) as the light bouncing surface. I set my flash to TTL mode. This mode measures the amount of light coming "Through The Lens" and when the camera determines that the right amount of light has been reached, the flash is turned off. This results in the proper amount of light reaching the film. This technique was used when taking the picture of the roses shown in this photo tip segment. The picture was actually taken in my family room at night. The way I bounce the light is to point the flash head about 45 degrees away from the subject and then hold the white foam board in front of the flash head at about 45 degrees to the flash head, directing the light back at the subject. I think the result is much more pleasing than a direct flash setup could produce. Give the technique a try and maybe even experiment to see what kind of results you can come up with.
|
|
Thankfully I live in an area where the weather is mild compared to many other locations. In the winter it rarely gets below freezing. In the summer however the weather can be quite hot. Temperatures over 100 degrees are quite common. The good thing about the hot temperature in my location is that the humidity is normally low. There are a few special weather conditions that I have experienced. Most of them have been experienced in my travels. Since I live in an area that gets hot, I will talk about that problem first. The main concern about heat is keeping your film away from it. This is especially important to remember when putting your gear in a car. Only leave your gear and film in a car when you are actually traveling. If you stop, take your film and gear out of the car. Even if it is only mildly warm, the temperature in your car can get quite hot. Never leave your camera or other gear on the dashboard of your car. If you do, you are only inviting trouble. I have been on camping trips where I had to leave some of my film in the car. In that situation I have put my film in a zip lock plastic bag and then put it in an ice chest along with my food. Another possible problem is keeping your film in your camera bag while it is exposed to sunlight. If your bag is black like mine is, it tends to absorb the heat from the sunlight. Just make sure that your bag is not left to sit in the sun for long periods of time. Either find a place in a shaded area or cover it with something to keep the sunlight from reaching it. Cold temperatures bring on another set of problems.  The two most common problems are reduced battery life and fogged lenses.
If you are out in the cold for any length of time try to keep your camera
and batteries warm. If you have a removable battery holder you might
consider taking the holder out of the camera and putting it in an inside
jacket pocket so that it will stay closer to the warmth created by your
body. I have also kept my camera inside my jacket with just the lens
sticking out when I want to keep the camera warm but have it ready for
action. The second problem is lens fogging. This usually happen because
you have breathed on the lens. This is also a problem with the viewfinder.
The only thing I can say about this problem is to avoid breathing on you
lens. Never try to blow dust off your lens with your mouth in cold weather.
If you do, the result will be a fogged lens or worse, frozen moisture on
your lens.
Another problem is in areas of warm temperatures with high humidity. In
conditions like this the problem is very similar to cold conditions.
Again the problem is with fogging lenses. The problem with breathing on
your lens is similar to cold conditions. The other problem is when going
from an air-conditioned area to the outside. Since your camera is cooler
than the outside temperature the moister in the air tends to condense
on exterior surfaces as soon as you go from the inside to the outside.
There are two techniques I use to deal with this problem. The first is
to set my camera bag outside about 15 to 30 minutes before I plan to go
outside. That way the bag and it's contents have time to equalize to
the outside temperature before you have to use it. Of course this can
only be done if you have a location that is secure from loss of
equipment due to theft. I have used my hotel balcony for this purpose
while traveling. The second technique is used to speed up the defogging
process in the event that it happens. In areas of low humidity we are
accustom to blowing on surfaces that are wet in order to speed up the
drying process. In areas of high humidity this only makes the problem
worse. In conditions like this I use a uv filter over the lens and if
it fogs up I grasp the filter around it's circumference. This helps to
bring up the temperature of the filter faster so that it will dry off
without actually touching the surface of the filter.
The last condition I want to talk about is rain. I have not had a lot
of experience with rain but I have used a couple of techniques. The
first is to shoot from inside my car. I have shot pictures both through
closed and open windows. The other thing I have done while shooting
from inside a vehicle is to put a lens hood on my lens and only stick
the lens outside the window for the time needed to take the picture.
The last thing I do is to have a plastic bag stored in my camera bag
to cover the camera just in case I am caught out in the rain. Hopefully
you can put some of these techniques to use.
The two most common problems are reduced battery life and fogged lenses.
If you are out in the cold for any length of time try to keep your camera
and batteries warm. If you have a removable battery holder you might
consider taking the holder out of the camera and putting it in an inside
jacket pocket so that it will stay closer to the warmth created by your
body. I have also kept my camera inside my jacket with just the lens
sticking out when I want to keep the camera warm but have it ready for
action. The second problem is lens fogging. This usually happen because
you have breathed on the lens. This is also a problem with the viewfinder.
The only thing I can say about this problem is to avoid breathing on you
lens. Never try to blow dust off your lens with your mouth in cold weather.
If you do, the result will be a fogged lens or worse, frozen moisture on
your lens.
Another problem is in areas of warm temperatures with high humidity. In
conditions like this the problem is very similar to cold conditions.
Again the problem is with fogging lenses. The problem with breathing on
your lens is similar to cold conditions. The other problem is when going
from an air-conditioned area to the outside. Since your camera is cooler
than the outside temperature the moister in the air tends to condense
on exterior surfaces as soon as you go from the inside to the outside.
There are two techniques I use to deal with this problem. The first is
to set my camera bag outside about 15 to 30 minutes before I plan to go
outside. That way the bag and it's contents have time to equalize to
the outside temperature before you have to use it. Of course this can
only be done if you have a location that is secure from loss of
equipment due to theft. I have used my hotel balcony for this purpose
while traveling. The second technique is used to speed up the defogging
process in the event that it happens. In areas of low humidity we are
accustom to blowing on surfaces that are wet in order to speed up the
drying process. In areas of high humidity this only makes the problem
worse. In conditions like this I use a uv filter over the lens and if
it fogs up I grasp the filter around it's circumference. This helps to
bring up the temperature of the filter faster so that it will dry off
without actually touching the surface of the filter.
The last condition I want to talk about is rain. I have not had a lot
of experience with rain but I have used a couple of techniques. The
first is to shoot from inside my car. I have shot pictures both through
closed and open windows. The other thing I have done while shooting
from inside a vehicle is to put a lens hood on my lens and only stick
the lens outside the window for the time needed to take the picture.
The last thing I do is to have a plastic bag stored in my camera bag
to cover the camera just in case I am caught out in the rain. Hopefully
you can put some of these techniques to use.
|
© Michael Fedler 1997 - 2024